Plugin Development
Now that you've learned about the plugin's features (see the usage documentation), we'll now demonstrate its implementation using a modular approach.
Each core feature is implemented as a separate plugin, adhering to the single responsibility principle. These modules can be freely assembled in development.
Preparation
- Create an empty directory, such assh
mkdir examples && cd examples - Install the scaffold lacktxt
npm i -g lackLack must be the latest version (
>= 1.4.0) - Update Whistle
Whistle must be the latest version (
>= 2.9.100, client>= 1.3.8)
rules.txt
- The plugin will automatically load and take effect after installation.
- Its functionality is the same as the rules configured in the UI Rules, but it has a lower priority than UI Rules.
- The plugin will become ineffective if disabled.
Example
Create a plugin containing the
rules.txtrules file:sh# Create a plugin directory mkdir whistle.test-rules && cd whistle.test-rules # Initialize the plugin containing rules.txt lack init rules # Run in development mode: Mount the plugin to Whistle. After mounting, you should see the `test-rules` plugin in the plugin list. lack watchEdit the generated
rules.txtfile:txt* reqHeaders://x-client=whistle.test-rulesAll requests passing through Whistle will automatically add the
x-client: whistle.test-rulesrequest header
What if the modified rules don't take effect? Please confirm:
- Has
lack watchbeen executed? - Are there any conflicting rules with the UI configuration?
- Is the plugin disabled?
- Has
_rules.txt
- Applies only to requests that match the plugin protocol.
- Supports both long (whistle.myplugin://) and short (myplugin://) protocols.
- Applies during the request processing phase.
pattern whistle.myplugin://value
pattern myplugin://value
Example
- Create a plugin containing the
_rules.txtrules file:
# Create the plugin directory
mkdir whistle.test-req-rules && cd whistle.test-req-rules

# Initialize the plugin containing the `_rules.txt` file
lack init _rules

# Run in development mode: Mount the plugin to Whistle. After mounting, you will see the `test-req-rules` plugin in the plugin list.
lack watch- Edit the generated
_rules.txtfile:txt* file://(hello)All requests return
helloin the response. - Directly access
https://www.example.com/testto return to the normal page. - Configure the following rules in the Rules interface (or the plugin's
rules.txtfile):txthttps://www.example.com/test whistle.test-req-rules://
Then, access https://www.example.com/test to return hello.
resRules.txt
- Only applies to requests matching the plugin protocol
- Applies during the response processing phase
- Can modify the response status code and content.txt
pattern whistle.myplugin://value
pattern myplugin://value
Example
- Create a plugin containing the
resRules.txtrule file:sh# Create a plugin directory mkdir whistle.test-res-rules && cd whistle.test-res-rules # Initialize the plugin including resRules.txt lack init resRules # Run in development mode: Mount the plugin to Whistle. After mounting, you should see the `test-res-rules` plugin in the plugin list. lack watch - Edit the generated
resRules.txtfile:txt* resBody://`(whistle_error_${statusCode})` includeFilter://s:500 includeFilter://s:404Change the response content for requests with
404and500status codes towhistle_error_404andwhistle_error_500respectively. - Configure the following rules in the Rules interface (or the plugin's
rules.txtfile):txthttps://www.example.com/500 whistle.test-req-rules:// statusCode://500 https://www.example.com/404 whistle.test-req-rules:// statusCode://404 `` - Effect:
- Accessing
https://www.example.com/500changes the response content towhistle_error_500 - Accessing
https://www.example.com/404changes the response content towhistle_error_404 - Accessing
https://www.example.com/testreturns the original content.
- Accessing
auth
Authenticate requests passing through Whistle.
Example
- Create a request authentication plugin:sh
# Create a plugin directory mkdir whistle.test-auth && cd whistle.test-auth # Initialize the plugin including auth lack init auth # Install dependencies npm i # Compile the code npm run dev # Run in development mode: Mount the plugin to Whistle. After mounting, you should see the `test-auth` plugin in the plugin list. lack watch - Edit the
src/auth.tsfile:tsexport default async (req: Whistle.PluginAuthRequest, options: Whistle.PluginOptions) => { const { fullUrl } = req; // The response status code for a URL containing `/test/forbidden` is 403 if (fullUrl.includes('/test/forbidden')) { return false; } // The response code for a URL containing `/test/message/forbidden` is 403, and the response content is customized. if (fullUrl.includes('/test/message/forbidden')) { req.setHtml('<strong>Access Denied</strong>'); return false; } // The URL contains `/test/login` and requires the user to enter a username and password. if (fullUrl.includes('/test/login')) { const auth = req.headers.authorization || req.headers['proxy-authorization']; if (auth) { // TODO: Verify the username and password. Return true if correct, otherwise return false. return true; } req.setLogin(true); return false; } // The response code for a URL containing `/test/redirect` is 302, and redirect to `https://www.example.com/test` if (fullUrl.includes('/test/redirect')) { req.setRedirect('https://www.example.com/test'); return false; } // Other requests are ignored // If you need to add custom request headers, use the `req.setHeader` method // Supports adding request headers with a key prefix of `x-whistle-` / // For example: req.setHeader('x-whistle-xxx', 'value'); req.setHeader('x-whistle-custom-header', 'lack'); return true; }; - Configure the following rule in the Rules interface (or the plugin's
rules.txtfile):txtwww.example.com whistle.auth:// - Effect:
- Access
https://www.example.com/test/forbiddenresponds with a403status code andForbiddencontent. - Visiting
https://www.example.com/test/message/forbiddenresponds with a403status code and<strong>Access Denied</strong>content. - Visiting
https://www.example.com/test/logindisplays a browser login dialog. - Visiting
https://www.example.com/test/redirectredirects tohttps://www.example.com/test. - Other requests to
www.example.comcomplete normally, with thex-whistle-custom-header: lackheader added.
- Access
sniCallback
Dynamically issues request certificates through the plugin.
Example
- Create a custom certificate plugin:
# Create the plugin directory
mkdir whistle.test-sni && cd whistle.test-sni

# Initialize the plugin including SNI
lack init sni

# Install dependencies
npm i

# Compile the code
npm run dev

# Run in development mode: Mount the plugin to Whistle. After mounting, you should see the `test-sni` plugin in the plugin list.
lack watch- Edit the
src/sniCallback.tsfile:
const key = `...`;
const cert = `...`;

// sniCallback plugin handler function - Dynamically determines the TLS tunneling method based on the request URL
export default async (req: Whistle.PluginSNIRequest, options: Whistle.PluginOptions) => {
const { fullUrl } = req;
// Returns false for special domains, maintaining the tunnel state (does not decrypt TLS).

if (fullUrl === 'https://tunnel.example.com') {
return false;

}

// Use a custom certificate to decrypt a specific domain, returning an object containing the key and cert.
// Supports certificate formats such as .crt, .pem, and .cer.

if (fullUrl === 'https://custom.example.com') {
return { key, cert };

}
// Use Whistle's built-in certificate to decrypt TLS traffic by default.
return true;
};- Configure the following rule in the Rules interface (or the plugin's
rules.txtfile):
www.example.com sniCallback://test-sni- Result:
- Accessing
https://tunnel.example.com/pathwill maintain the tunnel state (does not decrypt TLS). - Accessing
https://custom.example.com/test/reports a certificate error.
Other requests are normal.
rulesServer
Rule generation is done in real time using JavaScript. These rules function similarly to the static rules in _rules.txt above, but take precedence over those in _rules.txt.
Example
Create a plugin containing
rulesServer:sh# Create a plugin directory mkdir whistle.test-sni && cd whistle.test-rules-server # Initialize the plugin containing `rulesServer` lack init rulesServer # Install dependencies npm i # Compile the code npm run dev # Run in development mode: Mount the plugin to Whistle. After mounting, you should see the `test-rules-server` plugin in the plugin list. lack watchEdit the
src/rulesServer.tsfile:tsexport default (server: Whistle.PluginServer, options: Whistle.PluginOptions) => { server.on('request', (req: Whistle.PluginRequest, res: Whistle.PluginResponse) => { resh.end(JSON.stringify({ values: { 'whistle.test-rules-server/a.html': 'test normal values', }, rules: ` \`\`\` whistle.test-rules-server/b.html test inject values \`\`\` */a file://{whistle.test-rules-server/a.html} */b file://{whistle.test-rules-server/b.html} `, })); }); };Supports responding with plain rules text
res.end(rules)or a serialized object containing rules & valuesres.end(JSON.stringify({rules, values}))Configure the following rules in the Rules interface (or the plugin's
rules.txtfile):txttest.example.com whistle.test-rules-server://Effect:
- Access
https://test.example.com/areturnstest injected values - Visiting
https://test.example.com/breturnstest normal values
- Access
tunnelRulesServer
tunnelRulesServer is a dynamic rule generation mechanism specifically designed for handling TUNEL requests. Its core features are the same as the regular rulesServer, but its application scenarios are specifically differentiated:
- tunnelRulesServer only works for
tunnel://domain:porttunnel requests. - rulesServer works for
HTTP[S]/WebSocketrequests.
resRulesServer
Rule generation is done in real time during the request response phase using JavaScript (applicable to all request types). These rules function similarly to the static rules in resRules.txt above, but take precedence over those in resRules.txt.
Example
- Create a plugin containing
resRulesServer:sh# Create a plugin directory mkdir whistle.test-res-rules-server && cd whistle.test-res-rules-server # Initialize the plugin containing `resRulesServer` lack init resRulesServer # Install dependencies npm i # Compile the code npm run dev # Run in development mode: Mount the plugin to Whistle. After mounting, you should see the `test-res-rules-server` plugin in the plugin list. lack watch - Edit the
src/resRulesServer.tsfile:tsexport default (server: Whistle.PluginServer, options: Whistle.PluginOptions) => { server.on('request', (req: Whistle.PluginRequest, res: Whistle.PluginResponse) => { res.end('* resBody://(test-res-rules-server)'); }); }; - Configure the following rules in the Rules interface (or the plugin's
rules.txtfile):txttest.example.com/res whistle.test-res-rules-server:// - Result:
- Accessing
https://test.example.com/res/pathreturnstest-res-rules-server
- Accessing
statsServer
If you only want to obtain information such as the request URL, request method, request headers, and request content without performing any operations on the request, you can use statsServer.
Example
- Create a plugin containing
statsServer:sh# Create the plugin directory mkdir whistle.test-stats-server && cd whistle.test-stats-server # Initialize the plugin containing statsServer lack init statsServer # Install dependencies npm i # Compile the code npm run dev # Run in development mode: Mount the plugin to Whistle. After mounting, you should see the `test-stats-server` plugin in the plugin list. lack watch - Edit the
src/statsServer.tsfile:tsexport default (server: Whistle.PluginServer, options: Whistle.PluginOptions) => { server.on('request', (req: Whistle.PluginRequest) => { const { originalReq } = req; console.log('Value:', originalReq.ruleValue); console.log('URL:', originalReq.fullUrl); console.log('Method:', originalReq.method); console.log('Request Headers:', originalReq.headers); // Get the request body req.getReqSession((reqSession) => { if (reqSession) { console.log('Request Body:', reqSession.req.body); } }); }); }; - Configure the following rules in the Rules interface (or the plugin's
rules.txtfile):txtwww.example.com/stats whistle.test-stats-server://test - Result:
- Visit
https://www.example.com/statsConsole output:
shValue: test URL: https://www.example.com/stats Method: GET Request Headers: { host: 'www.example.com', 'cache-control': 'max-age=0', 'sec-ch-ua': '"Not)A;Brand";v="8", "Chromium";v="138", "Google Chrome";v="138"', 'sec-ch-ua-mobile': '?0', 'sec-ch-ua-platform': '"macOS"', 'upgrade-insecure-requests': '1', 'user-agent': 'Mozilla/5.0 (Macintosh; Intel Mac OS X 10_15_7) AppleWebKit/537.36 (KHTML, like Gecko) Chrome/138.0.0.0 Safari/537.36', accept: 'text/html,application/xhtml+xml,application/xml;q=0.9,image/avif,image/webp,image/apng,*/*;q=0.8,application/signed-exchange;v=b3;q=0.7', 'sec-fetch-site': 'cross-site', 'sec-fetch-mode': 'navigate', 'sec-fetch-user': '?1', 'sec-fetch-dest': 'document', 'accept-encoding': 'gzip, br', 'accept-language': 'zh-CN,zh;q=0.9,en;q=0.8', priority: 'u=0, i', 'x-forwarded-for': '127.0.0.1', connection: 'close' } Request Body: - Visit
resStatsServer
To obtain information such as the response status code, headers, and content without performing any operations on the request, use resStatsServer.
Example
- Create a plugin containing
resStatsServer:
# Create a plugin directory
mkdir whistle.test-res-stats-server && cd whistle.test-res-stats-server

# Initialize the plugin containing resStatsServer
lack init resStatsServer

# Install dependencies
npm i

# Compile the code
npm run dev

# Run in development mode: Mount the plugin to Whistle. After mounting, you should see the `test-res-stats-server` plugin in the plugin list.
lack watch- Install dependencies
npm i- Edit the
src/resStatsServer.tsfile:
export default (server: Whistle.PluginServer, options: Whistle.PluginOptions) => {
  server.on('request', (req: Whistle.PluginRequest) => {
    const { originalReq, originalRes } = req;
    console.log('Value:', originalReq.ruleValue);
    console.log('URL:', originalReq.fullUrl);
    console.log('Method:', originalReq.method);
    console.log('Server IP', originalRes.serverIp);
    console.log('Status Code:', originalRes.statusCode);
    console.log('Response Headers:', originalReq.headers);
    // Get the complete packet capture data of the request
    req.getSession((reqSession) => {
      if (reqSession) {
        console.log('Response Body:', reqSession.res.body);
      }
    });
  });
};- Configure the following rules in the Rules interface (or the plugin's
rules.txtfile):
www.example.com/res/stats whistle.test-res-stats-server://testResStats- Result:
- Visit
https://www.example.com/res/statsConsole output:txtValue: testResStats URL: https://www.example.com/res/stats Method: GET Server IP 127.0.0.1 Status Code: 200 Response Headers: { 'accept-ranges': 'bytes', 'content-type': 'text/html', etag: '"84238dfc8092e5d9c0dac8ef93371a07:1736799080.121134"', 'last-modified': 'Mon, 13 Jan 2025 20:11:20' GMT', server: 'AkamaiNetStorage', expires: 'Thu, 24 Jul 2025 02:36:23 GMT', 'cache-control': 'max-age=0, no-cache, no-store', pragma: 'no-cache', date: 'Thu, 24 Jul 2025 02:36:23 GMT', 'alt-svc': 'h3=":443"; ma=93600,h3-29=":443"; ma=93600', 'x-forwarded-for': '127.0.0.1', host: 'www.example.com', connection: 'close' } Response Body: <!doctype html> <html> <head> <title>Example Domain</title> ......
server
You can use a plugin as a server, which receives and forwards requests. The plugin can respond directly to the request or process it and forward it to the target server. After the target server returns the response, the plugin can further process it and ultimately return the result to the browser or client.
Example
- Create a plugin containing the
serverplugin:sh# Create the plugin directory mkdir whistle.test-server && cd whistle.test-server # Initialize the plugin containing the server lack init server # Install dependencies npm i # Compile the code npm run dev # Run in development mode: Mount the plugin to Whistle. After mounting, you should see the `test-server` plugin in the plugin list. lack watch - Edit the
src/server.tsfile: https://github.com/whistle-plugins/examples/tree/master/whistle.test-server - Configure the following rule in the Rules interface (or the plugin's
rules.txtfile):txthttps://raw.githubusercontent.com/avwo/whistle/refs/heads/master/package.json test-server://setCookieFromBody - Visit
https://raw.githubusercontent.com/avwo/whistle/refs/heads/master/package.json- Add
test-name=whistleto the browser cookie - Add
"pluginName":"whistle"to the response content
- Add
pipe
If the request/response content is encrypted or needs to be converted to a specific format for display in the packet capture interface, you can use pipe to pass the request/response content to the plugin for processing.
In the packet capture interface:
Modifications made by
reqWriteare not visible in the request dataModifications made by
resWriteare not visible in the response data (this is expected behavior)The actual modifications made by
xxxRexWriteoperations are not displayed in the packet capture interface
HTTP/HTTPS Protocol Implementation
Create the pipe http plugin:
sh# Create the plugin directory mkdir whistle.test-pipe-http && cd whistle.test-pipe-http # Initialize the plugin containing pipe http lack init pipeHttp,server # Install dependencies npm i # Compile the code npm run dev # Run in development mode: Mount the plugin to Whistle. After mounting, you will see the `test-pipe-http` plugin in the plugin list lack watchEdit the code: https://github.com/whistle-plugins/examples/tree/master/whistle.test-pipe-http
Configure the following rules in the Rules interface (or the plugin's
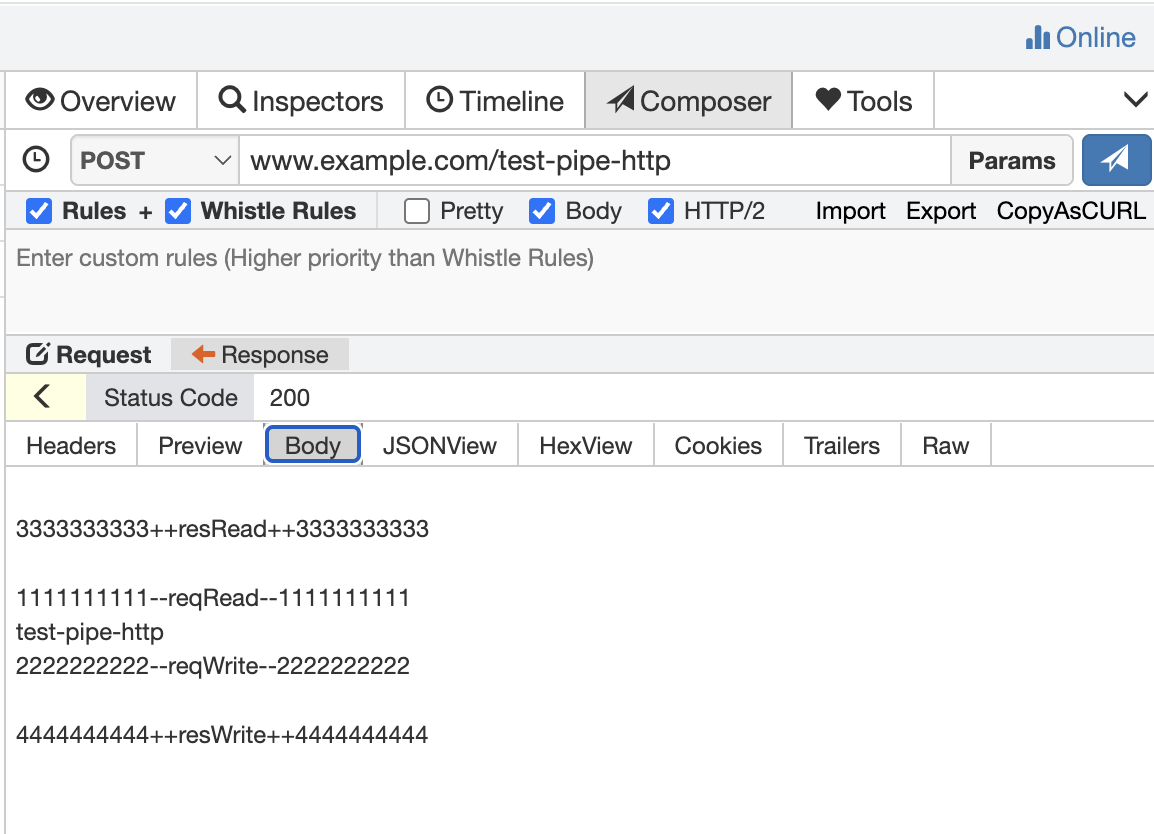
rules.txtfile):txtwww.example.com/test-pipe-http pipe://test-pipe-http test-pipe-http://mirrortest-pipe-http://mirroris used to match the server's response to the client's request.In Whistle / Network / Composer, enter
www.example.com/test-pipe-http, select thePOSTmethod, and entertest-pipe-httpin theBodyfield.
Click the Send button to view the response body as shown below.
WebSocket Protocol Implementation
Create the pipe websocket plugin:
sh# Create the plugin directory mkdir whistle.test-pipe-ws && cd whistle.test-pipe-ws # Initialize the plugin containing the pipe websocket plugin lack init pipeWs # Install dependencies npm i # Compile the code npm run dev # Run in development mode: Mount the plugin to Whistle. After mounting, you will see the `test-pipe-ws` plugin in the plugin list. lack watchEdit the code: https://github.com/whistle-plugins/examples/tree/master/whistle.test-pipe-ws
Configure the following rules in the Rules interface (or the plugin's
rules.txtfile):txtwss://echo.websocket.org/ pipe://test-pipe-wsOpen the page
https://echo.websocket.org/.wsYou can see the following result: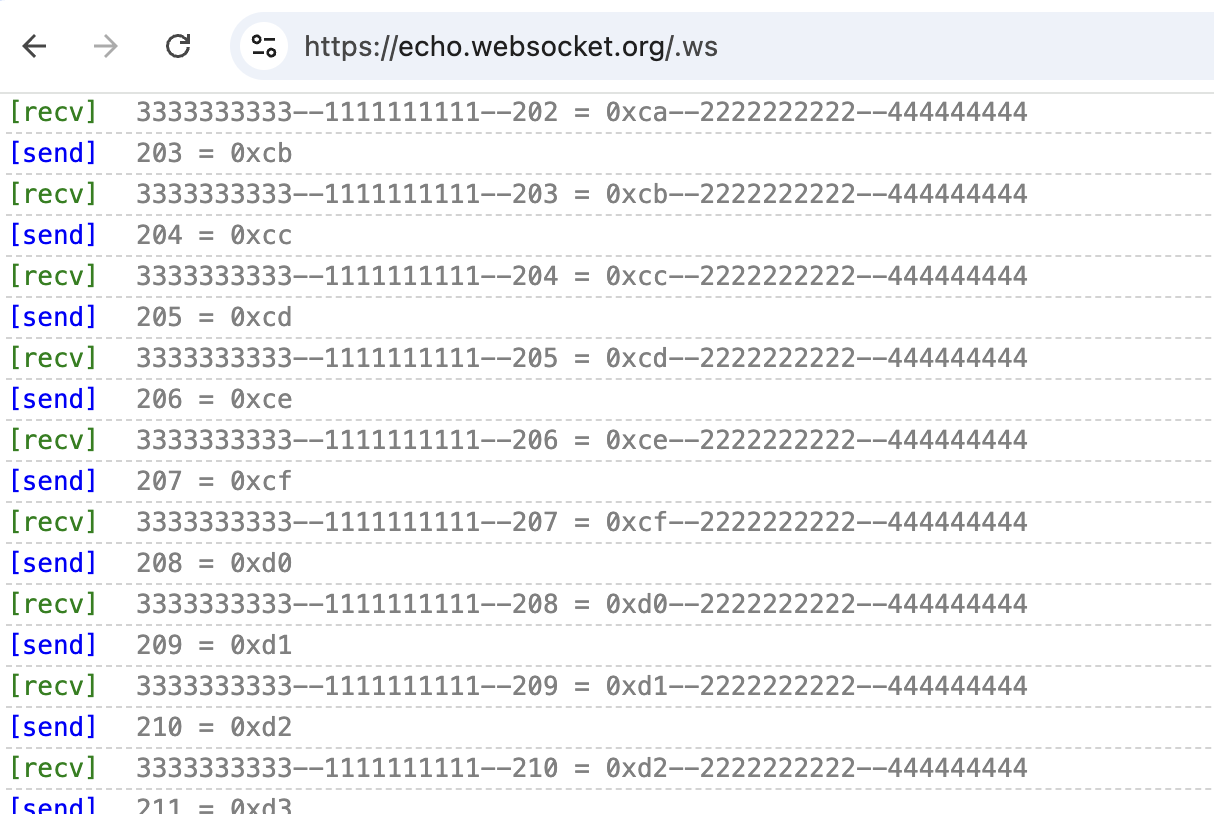
TCP Tunnel Implementation
Create the pipe tunnel plugin:
sh# Create the plugin directory mkdir whistle.test-pipe-tunnel && cd whistle.test-pipe-tunnel # Initialize the plugin containing the pipe tunnel lack init pipeTunnel.server # Install dependencies npm i --save-dev lack-proxy && npm i # Compile the code npm run dev # Run in development mode: Mount the plugin to Whistle. After mounting, you will see the `test-pipe-tunnel` plugin in the plugin list. lack watchEdit the code: https://github.com/whistle-plugins/examples/tree/master/whistle.test-pipe-tunnel
Configure the following rules in the Rules interface (or the plugin's
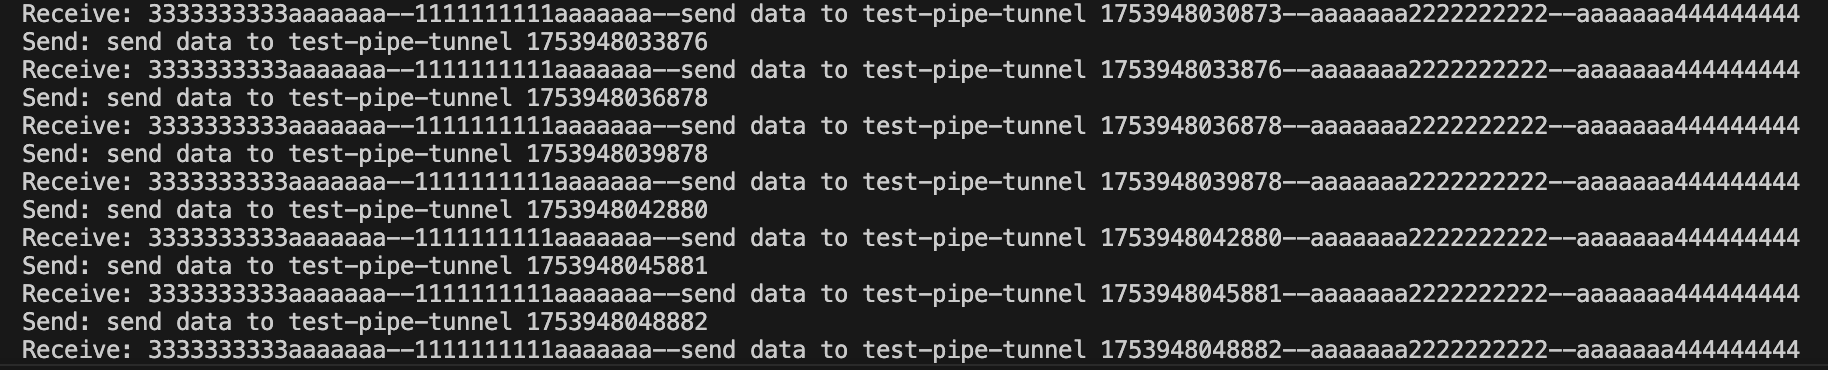
rules.txtfile):txttest-pipe-tunnel.example.com pipe://test-pipe-tunnel test-pipe-tunnel://mirrorExecute the
test.jsfile in thewhistle.test-pipe-tunnelroot directory:shnode test.jsConsole output
Plugin Operation Interface
In the Whistle plugin list, click Option or the plugin name to quickly open the plugin operation interface. The following three modes are supported:
- Tab Mode: Opens as a tab within the Whistle interface (default mode)
- Dialog Mode: Opens as a pop-up window within the Whistle interface.
- New Tab Mode: Opens in a new browser tab or client window.
1. Tab Mode (Default)
Features
- The default address for the plugin management interface is:
http[s]://domain[:port]/plugin.xxx/ - Open directly using
Optionsin the plugin list or by the plugin name
Disable Tab Mode To disable this opening mode, configure it in whistleConfig:
{
  ...
  "whistleConfig": {
    ...
    "noOption": true // Disable the default entry
    ...
  }
...
}
2. Dialog Mode
Features
- Supports opening the management interface via pop-up windows
- API callable by the pop-up window: https://github.com/avwo/whistle/blob/master/assets/modal.html
window.whistleBridgeAPI: https://github.com/avwo/whistle/blob/master/biz/webui/htdocs/src/js/bridge.js
Configuration Example
{
  "whistleConfig": {
    ...
    "openInModal": {
      "width": 360, // Popup width (px)
      "height": 566 // Popup height (px)
    }
    ...
  }
}
3. New Tab Mode
Scenario Use this when you need to use an external page as the plugin management interface.
Basic Configuration
{
  "pluginHomepage": "https://your-external-page.com" // External page URL
}
Advanced Options To force external links to open within Whistle (Tab or dialog mode):
Method 1: Dialog Mode
{
  ...
  "pluginHomepage": "https://your-external-page.com",
  "whistleConfig": {
    ...
    "openInModal": { // Force opening in a pop-up window
    "width": 360,
    "height": 566
    }
    ...
  }
  ...
}
Method 2: Tab Mode
{
  ...
  "pluginHomepage": "https://your-external-page.com",
  "whistleConfig": {
    ...
    "openInPlugins": true // Force opening in the plugin tab
    ...
  }
  ...
}
Complete Hooks API
Reference: https://github.com/avwo/lack/blob/master/assets/ts/src/types/global.d.ts
Plugin Variable Configuration
Supports % notation for configuration within rules. For details, see: Use of the % notation
Custom Rule Completion
In summary, each plugin can extend the following rules:
%myplugin=xxx
%myplugin.key=xxx
whistle.myplugin://xxx
myplugin://xxx
sinCallback://myplugin(sinValue)
pipe://myplugin(pipeValue)
Whistle also supports custom completion for the following rules:
%myplugin=xxx
%myplugin.key=xxx
whistle.myplugin://xxx
myplugin://xxx
Example
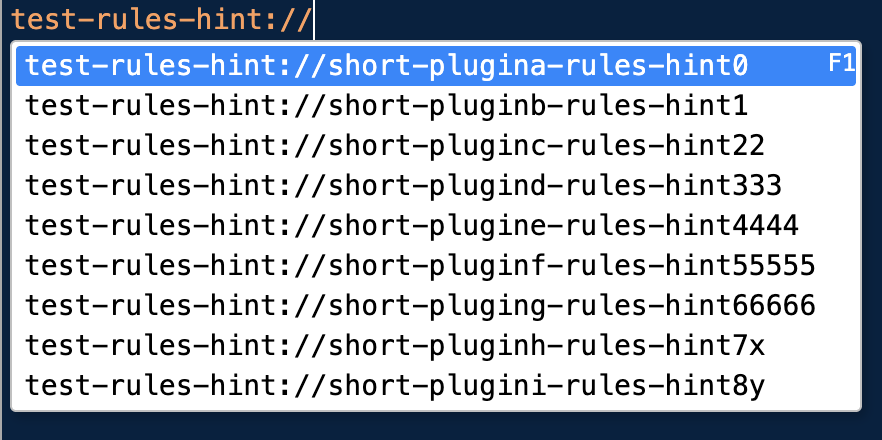
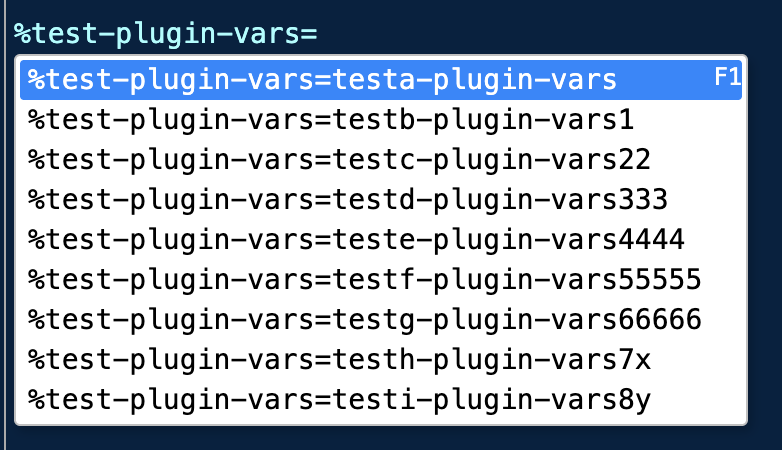
Create the rules hints plugin:
sh# Create the plugin directory mkdir whistle.test-rules-hint && cd whistle.test-rules-hint # Initialize the plugin including uiServer lack init uiServer # Install dependencies npm i # Compile the code npm run dev # Run in development mode: Mount the plugin to Whistle. After mounting, you will see the `test-rules-hint` plugin in the plugin list. lack watch- Configure
whistleConfiginpackage.json, addingpluginVarsandhintUrl:
js{ ... "whistleConfig": { "pluginVars": { ... "hintUrl": '/cgi-bin/plugin-vars' ... }, "hintUrl": '/cgi-bin/get-hints' }, ... }- Configure
Edit the
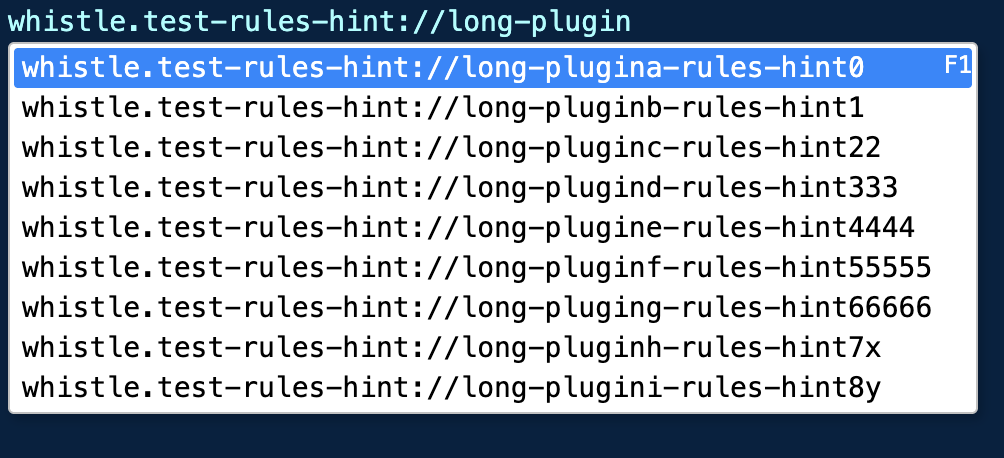
src/uiServer/router.tsfile:tsexport default (router: Router) => { // For `%test-rules-hint[.key]=xxx` router.get('/cgi-bin/plugin-vars', (ctx) => { const { sep, value } = ctx.query; const isKey = sep === '.'; let key = ''; let keyword = ''; if (value && typeof value === 'string') { if (isKey) { const index = value.indexOf('='); // %test-plugin-vars.xxx=yyy if (index !== -1) { key = value.substring(0, index); keyword = value.substring(index + 1).toLowerCase(); } else { // %test-plugin-vars.xxx or %test-plugin-vars.xxx= key = value; } } else { // %test-plugin-vars=yyy keyword = value.toLowerCase(); } } const result: (string | { isKey: true, value: string, })[] = []; VARS_OPTIONS.forEach((option) => { if (keyword && !option.toLowerCase().includes(keyword)) { return; } if (isKey) { result.push({ value: `${key}=${option}`, isKey: true, }); } else { result.push(option); } }); ctx.body = result; }); // For `test-rules-hint://xxx` and `whistle.test-rules-hint://xxx` // If `pluginVars.hintUrl` is not configured, `%test-rules-hint[.key]=xxx` will also be effective router.get('/cgi-bin/get-hints', (ctx) => { const { protocol, value } = ctx.query; if (!protocol || typeof protocol !== 'string' || typeof value !== 'string') { return; } const isVar = protocol.startsWith('%'); // This situation will not actually occur unless the `pluginVars.hintUrl` configuration is deleted if (isVar) { return; } const isLong = protocol.startsWith('whistle.'); const prefix = isLong ? 'long-' : 'short-'; const keyword = value.toLowerCase(); const result: string[] = []; HINTS_OPTIONS.forEach((option) => { if (`${prefix}${option.toLowerCase()}`.includes(keyword)) { result.push(`${prefix}${option}`); } }); ctx.body = result; }); };Effect:
Interface Extensions
The Whistle plugin system supports extending the following interface modules:
- Network Module
- Data Table Column Extensions
- Context Menu Extensions
- Details Panel Tab Extensions
- Rules Module Context Menu
- Values Module Context Menu
- Plugins Module Context Menu
Creating a Sample Plugin
sh# Create a plugin directory mkdir whistle.test-ui-ext && cd whistle.test-ui-ext # Initialize a blank plugin lack init blank # Run in development mode lack watchEdit
whistleConfig: https://github.com/whistle-plugins/examples/tree/master/whistle.test-ui-ext/package.jsonAfter executing, you should see the
test-ui-extplugin in the Whistle plugin list.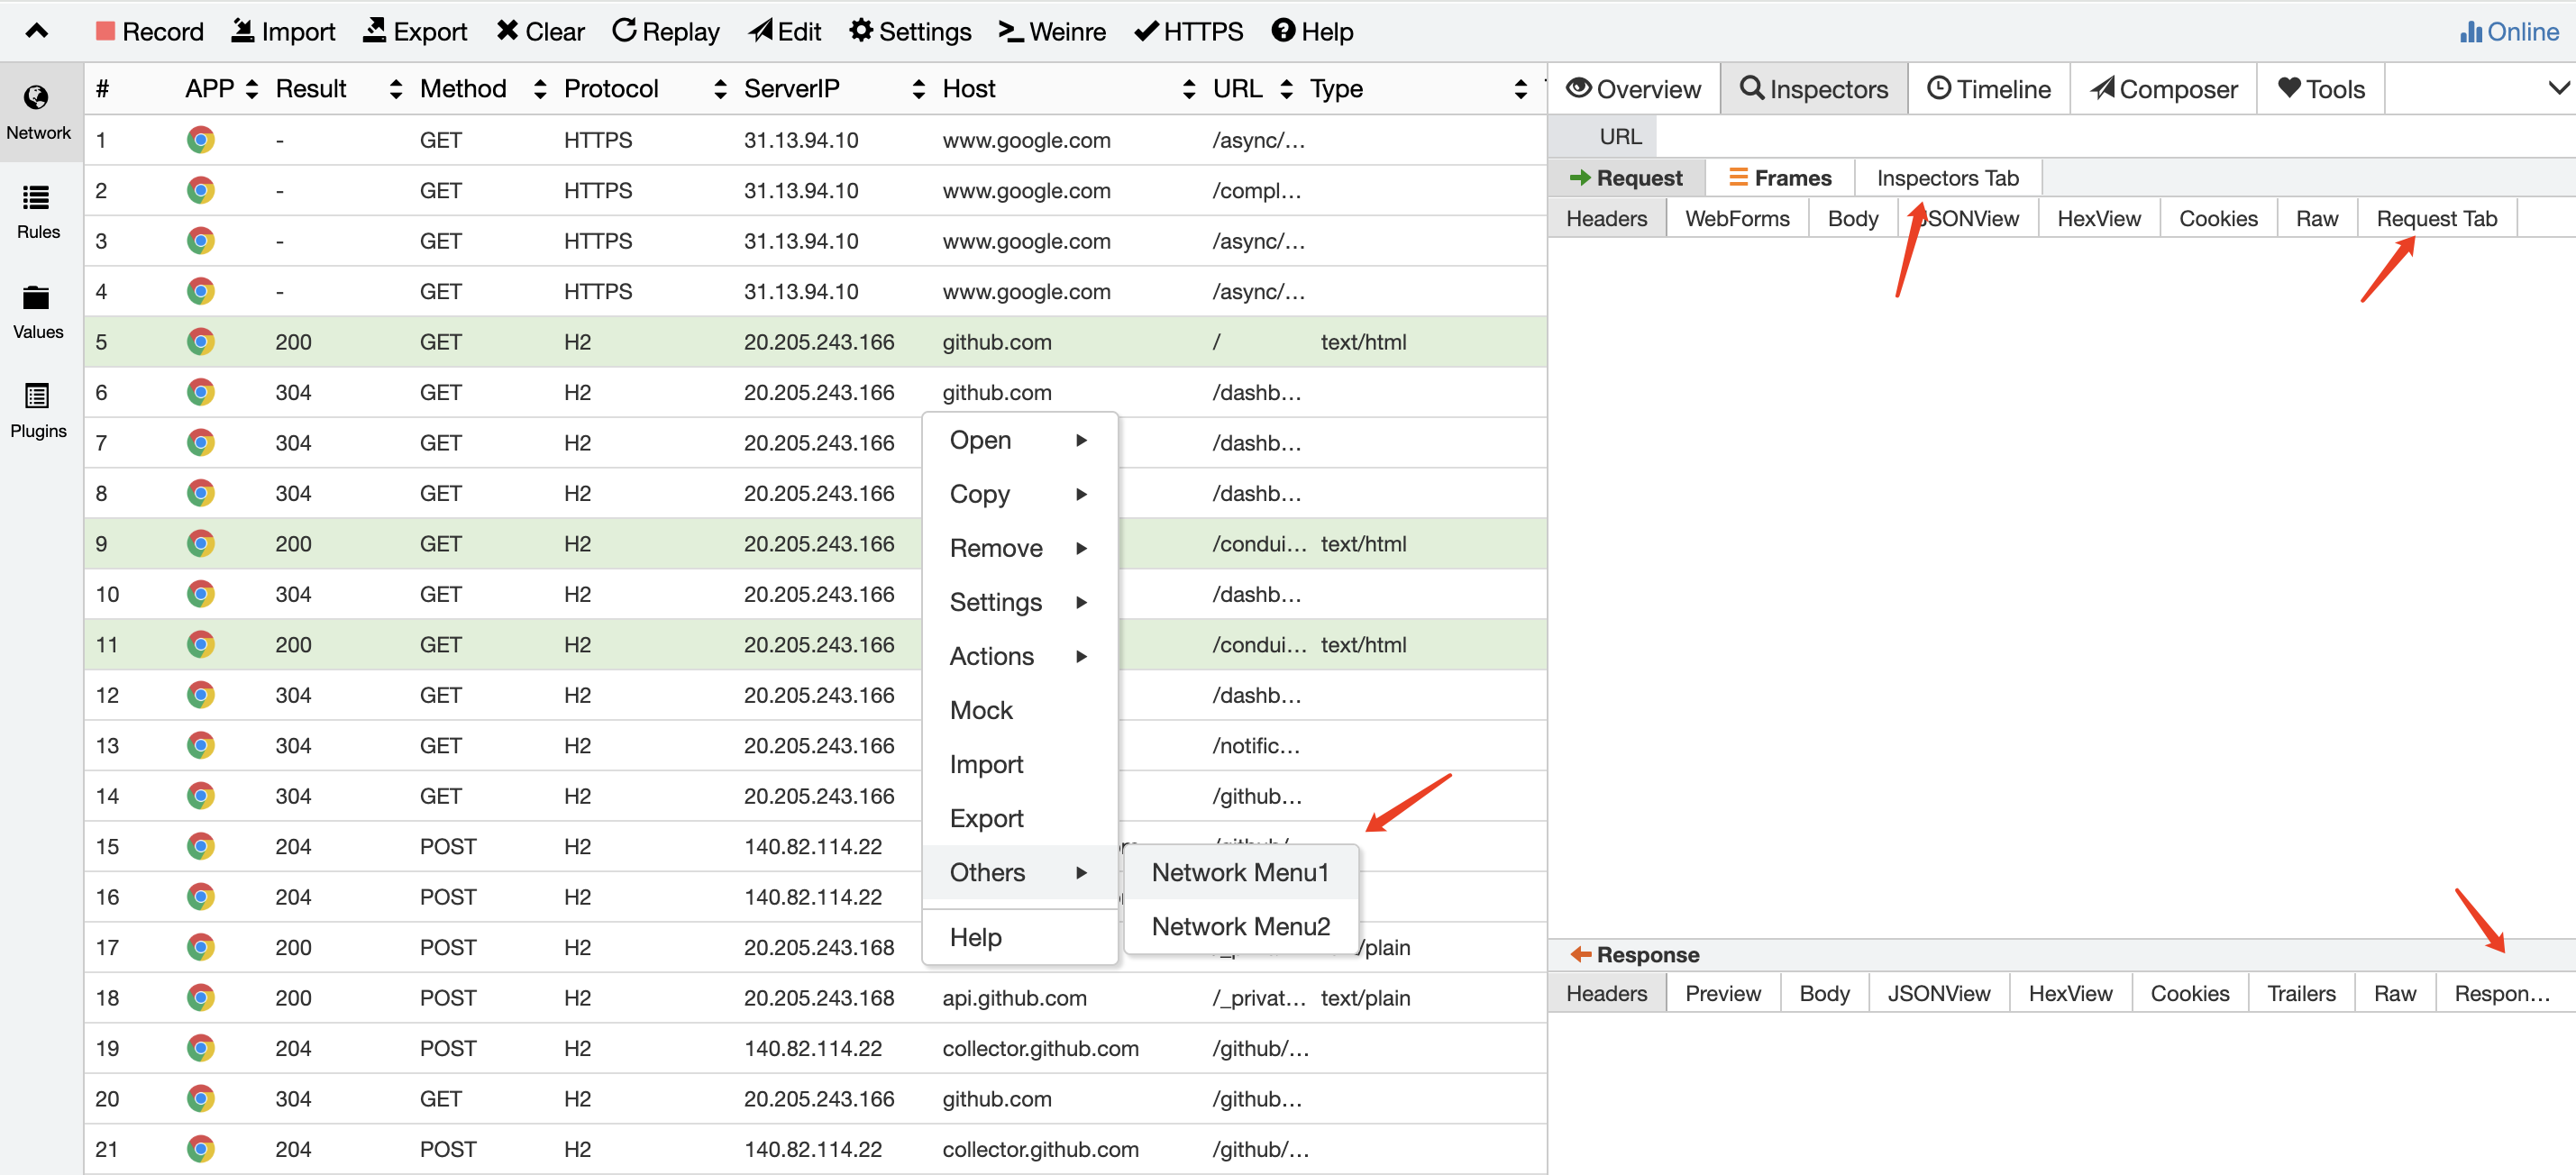
1. Network Table Column Extension
Configuration Example:
{
  ...
  "whistleConfig": {
    ...
    "networkColumn": {
      "name": "Referer", // Column display name (required)
      "key": "req.headers.referer", // Data field path (required)
      "iconKey": "", // Icon field (optional)
      "showTitle": true, // Whether to display a hover tooltip (optional)
      "width": 120 // Column width (optional, default 120)
    }
    ...
  }
  ...
}
Advanced Data Processing:
- Create
/public/webWorker.js:jsmodule.exports = function(session, next) { const isGithub = /^https?:\/\/github\.com\//.test(session.url); next({ testWebWorker: 'custom_value', style: isGithub ? { color: '#fff', fontStyle: 'italic', bgColor: 'red' } : null }); }; - Configure webWorker:js
{
  "whistleConfig": {
    "networkColumn": {
      "name": "Test",
      "key": "customData.testWebWorker" // Access webWorker return data
      ...
    },
    "webWorker": "/public/webWorker.js"
  }
}
2. Details Panel Tab Extension
{
  "whistleConfig": {
  "inspectorsTab": {
    "name": "Custom Tab", // Tab display name
    "action": "/public/tab.html", // Function page
    "icon": "data:image/png;base64,...", // Icon (optional)
    "req": { // Request sub-Tab
      "name": "Req SubTab",
      "action": "/public/req-tab.html"
    },
    "res": { // Response sub-Tab
      "name": "Res SubTab",
      "action": "/public/res-tab.html"
    }
  },
  "composerTab": { /* Same as inspectorsTab */ },
  "toolsTab": { /* Same as inspectorsTab */ }
  }
}- API callable by Tab page: https://github.com/avwo/whistle/blob/master/assets/tab.html
window.whistleBridgeAPI: https://github.com/avwo/whistle/blob/master/biz/webui/htdocs/src/js/bridge.js
3. Network Context Menu Functionality
{
  ...
  "whistleConfig": {
    ...
    "networkMenus": [
      {
        "name": "Network Menu1",
        "action": "/public/network-menu.html",
        "required": false, // Defaults to false. In list mode, whether to disable this item in the context menu for items other than list items
        "requiredTreeNode": false, // Defaults to false. In tree mode, whether to disable this item in the context menu for items other than list items
        "urlPattern": ""
      },
      {
        "name": "Network Menu2", // Menu item name
        "action": "/public/network-menu.html", // Function page
        "required": true, // Defaults to false. In list mode, whether to disable this item in the context menu for items other than list items
        "requiredTreeNode": true, // Defaults to false. In tree mode, whether to disable this item in the context menu for items other than list items
        "urlPattern": ""
      }
    ],
    ...
  }
  ...
}- API callable by the context menu's
actionpage: https://github.com/avwo/whistle/blob/master/assets/menu.html window.whistleBridgeAPI: https://github.com/avwo/whistle/blob/master/biz/webui/htdocs/src/js/bridge.js
3. Rules Context Menu Functionality
{
  ...
  "whistleConfig": {
    ...
    "rulesMenus": [
      {
        "name": "Rules Menu1", // Menu item name
        "action": "/public/rules-menu.html", // Function page
        "required": false, // Defaults to false. Should the context menu for items other than list items in list mode be disabled?
        "requiredTreeNode": false, // Defaults to false. Should the context menu for items other than list items in tree mode be disabled?
        "urlPattern": ""
      },
      {
        "name": "Rules Menu2",
        "action": "/public/rules-menu.html",
        "required": false, // Defaults to false. Should the context menu for items other than list items in list mode be disabled?
        "requiredTreeNode": false, // Defaults to false. Should the context menu for items other than list items in tree mode be disabled?
        "urlPattern": ""
      }
    ],
    ...
  }
  ...
}- API callable by the
actionpage of the context menu: https://github.com/avwo/whistle/blob/master/assets/menu.html window.whistleBridgeAPI: https://github.com/avwo/whistle/blob/master/biz/webui/htdocs/src/js/bridge.js
4. Values context menu functionality
{
  ...
  "whistleConfig": {
    ...
    "valuesMenus": [
      {
        "name": "Values Menu1",
        "action": "/public/values-menu.html",
        "required": false, // Defaults to false. In list mode, disable the context menu for items that are not list items.
        "requiredTreeNode": false, // Defaults to false. In tree mode, disable the context menu for items that are not list items.
        "urlPattern": ""
      },
      {
        "name": "Values Menu2",
        "action": "/public/values-menu.html",
        "required": false, // Defaults to false. Should the context menu for items other than list items in list mode be disabled?
        "requiredTreeNode": false, // Defaults to false. Should the context menu for items other than list items in tree mode be disabled?
        "urlPattern": ""
      }
    ],
    ...
  }
  ...
}- Context menu
actionpage API: https://github.com/avwo/whistle/blob/master/assets/menu.html window.whistleBridgeAPI: https://github.com/avwo/whistle/blob/master/biz/webui/htdocs/src/js/bridge.js
5. Plugins Context Menu Functionality
{
  ...
  "whistleConfig": {
    ...
    "pluginsMenus": [
      {
        "name": "Plugins Menu1",
        "action": "/public/plugins-menu.html",
        "required": false, // Defaults to false. Should this item be disabled in the context menu for items other than list items in list mode?
        "requiredTreeNode": false, // Defaults to false. Should this item be disabled in the context menu for items other than list items in tree mode?
        "urlPattern": ""
      },
      {
        "name": "Plugins Menu2",
        "action": "/public/plugins-menu.html",
        "required": false, // Defaults to false. Should this item be disabled in the context menu for items other than list items in list mode?
        "requiredTreeNode": false, // Defaults to false. Should this item be disabled in the context menu for items other than list items in tree mode?
        "urlPattern": ""
      }
    ],
    ...
  }
  ...
}- The
actionpage of the context menu can call API: https://github.com/avwo/whistle/blob/master/assets/menu.html window.whistleBridgeAPI: https://github.com/avwo/whistle/blob/master/biz/webui/htdocs/src/js/bridge.js
Special path
Whistle provides a dedicated path format for directly requesting plug-in interfaces under various types of pages, as well as paths that can only be accessed normally in the Whistle environment.
1. Direct access to the Whistle interface
In the Whistle interface or plug-in management interface, you can directly access the plug-in interface using the following formats:
path/to- This path will automatically resolve to
/whistle.xxx/path/to - It is recommended to use relative path format to avoid using absolute paths directly
/path/to
2. Regular page access
If you need to call the plug-in interface in a normal web page that is not Whistle, use the following special path format:
/.whistle-path.5b6af7b9884e1165./whistle.xxx/path/to- When requests arrive at the plug-in, they will be standardized to:
/whistle.xxx/path/to - Prefix
/.whistle-path.5b6af7b9884e1165./is a dedicated identifier for Whistle, used to mark internal request routing
3. Environment adaptive path conversion
Implementing uses different paths when passing or not through Whistle proxy, but ensuring that the backend service receives a unified path:
/_WHISTLE_5b6af7b9884e1165_/- Original request:
https://www.example.com/.../_WHISTLE_5b6af7b9884e1165_/path/to?query - After Whistle, it is converted to:
https://www.example.com/.../path/to?query
illustrate:
xxxfor your plugin namepath/tois the specific path to the plug-in interface- Hash value in a special path
/.whistle-path.5b6af7b9884e1165./is a fixed identifier
Other whistleConfig Configurations
{
  ...,
  "homepage": '', // Plugin help page address
  "pluginHomepage": '', // Custom plugin operation page address, defaults to `/plugin.xxx/`
  "whistleConfig": {
    "hideLongProtocol": false, // Whether to hide the plugin's long protocol. If set to true, the plugin's protocol will be displayed as deleted when configured in the Rules interface.
    "hideShortProtocol": false, // Whether to hide the plugin's short protocol. If set to true, the plugin's protocol will be displayed as deleted when configured in the Rules interface.
    "priority": 0, // The default value is 0. Plugin priority is sorted from oldest to newest by update time (older updates have higher priority). This field can be used to adjust the priority order.
    "favicon": '', // The icon on the plugin tab. This can be the plugin's relative path `/public/xxx.png` Or an absolute path `https://xxx` or `data:image/png;base64,xxx`
    "registry": '', // Plugin's npm registry
    "noOption": false, // If the operation interface does not exist, set this to true to gray out the Option button
    "enableAuthUI": false, // Whether the plugin's auth hook applies to the plugin operation interface (use with caution)
    "tunnelKey": '', // String or string array. If you need to continue to proxy the request through the tunnel to another HTTP proxy, you can specify which request headers to pass through
    ...
  },
  ...
}
Plugin Page Internal Path Specifications
Plugin page URLs typically follow the following format:
/plugin.xxx/path/yyy.html/whistle.xxx/path/yyy.html
The root directory is /plugin.xxx/ or /whistle.xxx/, so:
✅ It is recommended to use relative paths instead of absolute paths (e.g., /path/to).
Relative Path Usage Examples
Scenario 1: Page Located in the Plugin Root DirectoryPage Address: /plugin.xxx/yyy.htmlCorrect Method:
./path/topath/toIncorrect Method:- ❌
/path/to(Absolute path, may result in access errors)
Scenario 2: Page Located in a SubdirectoryPage Address: /plugin.xxx/a/b/c/yyy.htmlCorrect Method:
../../../path/to(Goes back three levels and then to the target path)
Incorrect Method:
- ❌
/path/to(Absolute path, may result in access errors) - ❌
path/to(Based on the current directorya/b/c/) (This can lead to path errors)
Best Practices
It is recommended to use
./prefix to explicitly indicate relative to the current directory (e.g.,./assets/style.css).Avoid hard-coding paths starting with
/to prevent invalid paths in different deployment environments.Test path references: Verify that resources load properly both locally and in production environments.
Frequently Asked Questions
❓ Q: Why can't absolute paths be used?
📌 A: Plugins may be deployed in different environments (e.g., testing/production/embedded in other projects). Absolute paths may cause resource loading failures.
❓ Q: Some build tools, such as Vite, resolve resource paths based on the base setting by default. If base is set to /, ../ may be optimized to /. How can this be resolved?
📌 A: Try changing the base to ./:
// vite.config.js
export default defineConfig({
  base: './', // Force relative paths
});
Recommended to optimize this with the backend routing configuration
Publishing Plugins
The Whistle plugin publishing method is exactly the same as a regular NPM package. Simply follow the standard NPM publishing process:
- Log in to NPM (or your enterprise private repository; the latter requires setting
npm config set registry https://xxxfor your enterprise private repository):shnpm login - Execute the publish command in the plugin root directory:sh
npm publish
References
- Example source code repository: https://github.com/whistle-plugins/examples
- Scaffolding command: https://github.com/avwo/lack